
CaseWorthy – Exiting one family member from Enrollment (When the HoH and other members stay Enrolled)
To download or print this document, please click here.
Table of Contents
How to use the Copy Assessments Feature
Overview
Instructions on how to remove existing family members from a program enrollment without removing the HoH or other members in CaseWorthy.
Instructions
Emergency Shelters – Please make sure you’ve ended the Bedlist Reservation (Step 1 in “Program Tools” for the client that is exiting BEFORE exiting the client or you will have to reopen their enrollment.
- Make sure the person or HoH that you wish to exit is visible in the top left corner. You can use “Find Client” to search for that person.
- Go to “Case Management” then “Program Enrollment”.
- Click on the “Gear” next to the Program Enrollment the family member needs to be exited from.
- Click on “Edit/Exit Enrollments for family members”.

- Click on the name of the “Client/Family Member” you wish to exit.
- Click on “Complete Exit Assessment”. The Exit workflow will appear.
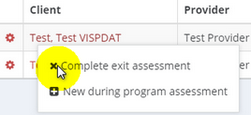
See How to Use the Copy Assessments Feature if that option appears
- In the “Assessment” field, click on the date and program or “down arrow” so that it can expand to show you the “Edit Date/Restriction” option (see screenshot below).
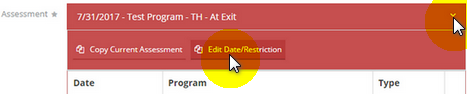
- Click on “Edit Date/Restriction” so that you can change the Assessment Date.
- Change the “Assessment date” to the family members “Exit date” (see screenshot below).
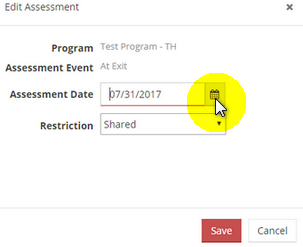
- Click “Save”. The assessment date will change to the date you entered, so you can now proceed.
- Complete the Exit workflow and click “Done” once you get to the workflow is now complete screen. This will create “At Exit” assessment for the person(s) exited.
How to use the Copy Assessments Feature
- Follow the steps below if you want to copy an assessment using this feature.
- Click “Yes”, then click “Done”.
- On the Select Family Members screen, click on the “checkbox” next to each client that you want to copy assessments for.
- Click on the “magnifying glass” to load the copy assessments screen.
- Choose the assessment that you want to copy data from by click on the “radio button” next to it. Then click “Select”.
- The Select Family Members screen will load displaying the assessment you selected. Click on “Copy Assessment”.
- Once the “Assessments copied successfully” box pops up click Ok. The screen will refresh and show the copied data.
- Please be sure to review all copied data for accuracy and change any copied data that is different than the client’s discharge for says.
- If you don’t want to use the feature, simply click No, then click Done.
Below you will find the link for the HMIS Data Standards Manual where you can find more specific information from the federal partners (ex. why is this question asked?):
https://www.hudexchange.info/resource/3824/hmis-data-dictionary/