
PATH DMHAS DDaP Outreach Projects Quick Guide
To download or print this document, please click here.
Table of Contents
Enrolling a Client into a Street Outreach Project/Program (Non DMHAS Funded)
Before You Begin (User Area Setup for Non DMHAS Funded Outreach Projects)
Enrolling a Client into a DMHAS Funded PATH Project
PATH/DMHAS Pending Enrollments View (DMHAS Funded PATH Projects)
How to correct Services (DMHAS/PATH) – (DMHAS Funded PATH Projects)
Including Clinician Information in DDaP Extract – DMHAS Funded PATH Projects
HMIS One Time Fields – PATH (All Funders)
Referrals (PATH Specific) (Required each time a referral is made) by All Funders
Updating a Client’s record (During/Annual Assessment)
Exiting/Discharging a Client from a program – All Funders
Uploading/Deleting Files and Documents – All Funders
To Delete an uploaded document
HMIS Data Standards Manual link
Overview
Instructions/guide on how to enroll in Path Outreach in HMIS as well as a DMHAS Funded PATH Project in HMIS.
Enrolling a Client into a Street Outreach Project/Program (Non DMHAS Funded)
Before You Begin (User Area Setup for Non DMHAS Funded Outreach Projects)
- Please ensure you are using the PATH Outreach Role found under your name. (Top right corner – see screenshot).
- Your Provider should be the name of the Provider
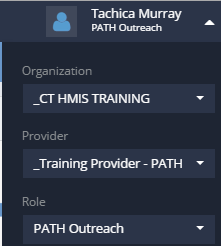 you wish to enter data for (Top right corner – see screenshot)
 - Click “Enroll PATH Outreach Client” from the left side menu to launch the workflow.
- Enter the CaseWorthy ID or the first few letters of the First and Last Name and Date of Birth.
- Click “Check for duplicates” and review the results.
- If the client is not found in the search results, click This is a new client to proceed.
- Complete all required fields indicated by the stars.
- Click Save.
- The “CCEH HMIS Add Family Member Spreadsheet” screen will load. If enrolling an INDIVIDUAL (without a child/spouse) just click Save to proceed to the next page.
- If enrolling a family, complete the following steps:
- Click Add Row to enter additional family members (do this for each family member you need to add). Add all family members BEFORE clicking the Save button!!
- Check for Duplicates is required (*) for each additional family member. If no matches are found, you must click the “This is a new client” button to proceed.
- Click Save to proceed to the next page (located in the bottom right corner).
- Next you will see the “Release of Information” screen. Change the Release Start & End Dates. Enter Yes for Witness/Client has signed release (make sure it was signed). Click Save. Even if only entering an individual still ask if they want to include children, if you select NO you will hide any previously entered household members under the age of 18 that are tied to this HoH
- Choose the Program the client is being enrolled in. Make sure the Program Entry Date is accurate and is ON or AFTER the ROI sign date. Click Save.
- Begin date of HMIS Program enrollment = First contact with the client. This is not the actual date the client is enrolled into your program. That is the Date of PATH Status Determination which is located in the one time field area (see below section for HMIS One Time Fields – PATH)
- Next the “HMIS Enrollment Members” screen will appear. If enrolling an INDIVIDUAL (without a child/spouse) just click Save to proceed to the next page.
- If enrolling a family, complete the following steps:
- Click the checkbox next to family member’s names to include them in the program enrollment and the rest of this workflow. Their checkbox will turn blue.
- Make sure to change the Begin Date to the correct date! Note, this does not necessarily match the HoH start date. This date is either ON or AFTER
- Click Save to proceed to the next page (located in the bottom right corner).
- Complete the assessments as prompted from within the Enroll Client Workflow, clicking “SAVE” in the bottom right corner of each screen when you have provided answers to all required questions (indicated by the stars).
- Once you have completed the workflow, the client will appear as “Enrolled” in the Enrollment Member – CT HMIS screen (found by clicking Case Management>Program Enrollment left side menu). Make sure to update the One Time fields now that the enrollment has been created.
Enrolling a Client into a DMHAS Funded PATH Project
Before You Begin (User Area Setup for DMHAS Funded PATH Outreach Projects)
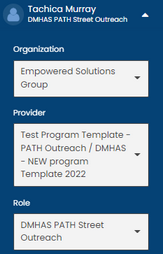
- Please ensure you are using the DMHAS PATH Street Outreach Role found under your name. (Top right corner – see screenshot).
- Your Provider should be the name of the Provider you wish to enter data for (Top right corner – see screenshot)
- Click “Enroll DMHAS/PATH/Outreach Client” from the left side menu to launch the workflow.
- Enter the CaseWorthy ID or the first few letters of the First and Last Name and Date of Birth.
- Click “Check for duplicates” and review the results.
- If the client is not found in the search results, click This is a new client to proceed.
- Complete all required fields indicated by the stars.
- Click Save.
- The “HMIS Add Family Member Spreadsheet” screen will load. If enrolling an INDIVIDUAL (without a child/spouse) just click Save to proceed to the next page.
- If enrolling a family, complete the following steps:
- Click Add Row to enter additional family members (do this for each family member you need to add). Add all family members BEFORE clicking the Save button!!
- Check for Duplicates is required (*) for each additional family member. If no matches are found, you must click the “This is a new client” button to proceed.
- Click Save to proceed to the next page (located in the bottom right corner).
- Next you will see the “Release of Information – PATH – CTHMIS” screen. Change the Release Start & End Dates. Enter Yes for Witness/Client has signed release (make sure it was signed). Click Save. Even if only entering an individual still ask if they want to include children, if you select NO you will hide any previously entered household members under the age of 18 that are tied to this HoH
- Next you will see the “Enrollment Add – PATH – CTHMIS” screen. Choose the Program the client is being enrolled in. Make sure the Program Entry Date is accurate and is ON or AFTER the ROI sign date. Click Save.
- Begin date of HMIS Program enrollment = First contact with the client. This is not the actual date the client is enrolled into your program. That is the Date of PATH Status Determination which is located in the one time field area (see below section for HMIS One Time Fields – PATH)
- Next the “HUD Universal Data” assessment will appear. Complete the required fields. Click Save to proceed to the next page (located in the bottom right corner).
- Next the “HUD Program Data” assessment will appear. Complete the required fields. Click Save to proceed to the next page (located in the bottom right corner).
- Next the “PATH Determination Assessment” will appear.

- Selecting “Enrollment Pending” in the PATH/DMHAS Enrollment Type field will trigger the shorter workflow.
- Selecting “Complete Enrollment” in the PATH/DMHAS Enrollment Type field will trigger the PATH/DMHAS Full Enrollment workflow.
- Click Save to proceed to the next page (located in the bottom right corner).
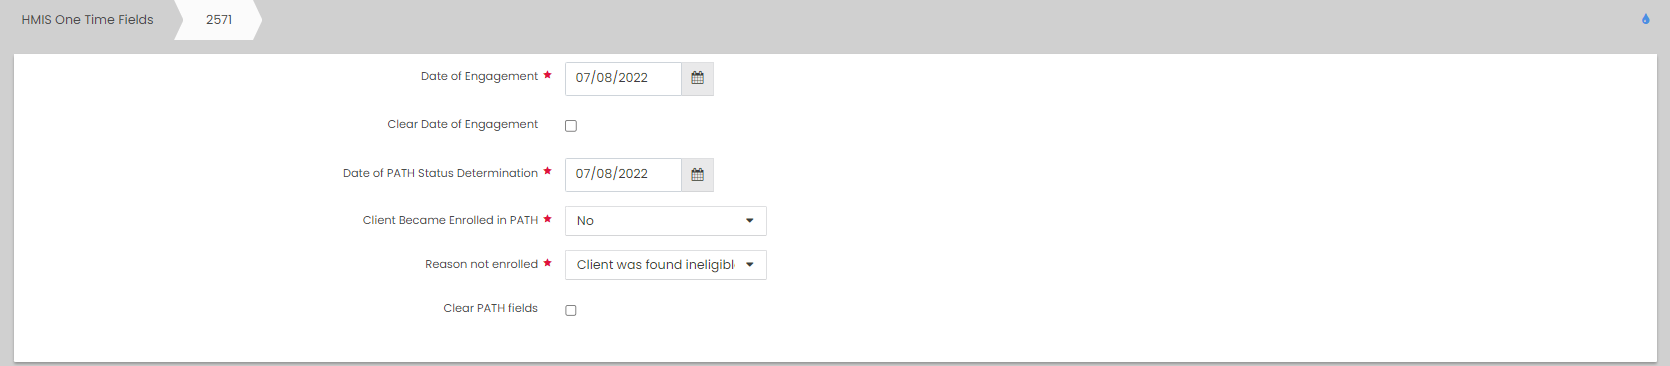
- Next the “HMIS One Time Fields” form will appear. Complete the required fields (see HMIS One Time Fields – PATH below for an explanation of each required field.
- Once you have completed the workflow, the client will appear on the HMIS Enrollment Member Summary form with an Enrollment Status of Enrollment Pending. Located by clicking Case Management > Program Enrollment (left side menu). Make sure to enter your contacts via the Current Living Situation form and Address via the Address and Contact Info form, now that the enrollment has been created.
Address (Required for DDaP extract after enrollment is complete) for DMHAS Funded PATH Projects
- On the left-side navigation, click “Case Management”.
- On the sub-menu, click “Address and Contact Info”.
- Click “Add new” (top left corner).
- Complete all required fields and click save.
- Note: A client should only have one CURRENT address. Make sure to add an End Date and update the status on the prior address to “Previous Address”
Case Notes/Services (DMHAS/PATH) required by DMHAS Funded PATH Projects
- On the left-side navigation, click “Case Management”. On the sub-menu, click “Case Notes/Services (DMHAS/PATH).
- Click “Add new DMHAS Casenote/Service” (top left corner).
- Complete required fields.
- Click “Post Service” after entering a case note.
- In the “Service Entry Post Control – DDaP” screen, complete all required fields. Make sure the Begin/End Dates are the same (ex. 01/01/16-01/01/16). Enter the units of service in 15 minute increments (ex. 15/30/45/90).
- Click “Update” in the bottom right corner.
- Review the case notes for accuracy then click “Save” in the bottom right corner.
PATH/DMHAS Pending Enrollments View (DMHAS Funded PATH Projects)
Accessible via Case Management Tab > Left Menu > Case Management > PATH Enrollments Pending View
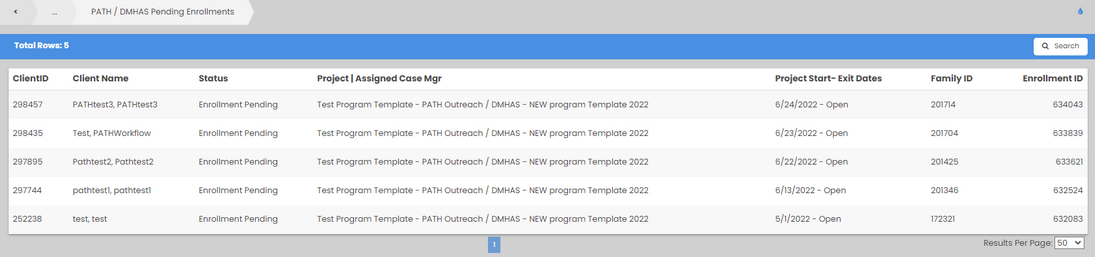
- This view was developed to assist with keeping the Client’s whose enrollments have not been completed via the “DMHAS PATH Full Enrollment/Complete Enrollment” workflow on your radar.
- Only clients with a Program Enrollment Status = Enrollment Pending will show in this view.
- Those that have the PATH Full Enrollment completed will not show up here.
- This list should be monitored to ensure that clients who need a full enrollment get one via the DMHAS PATH – Full Enrollment workflow (see screenshot below)
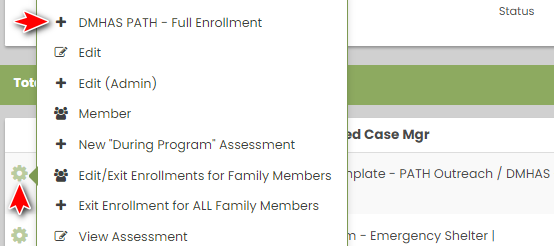
Accessing the DMHAS PATH Full Enrollment Workflow (for Client’s with an Enrollment Pending Status) – DMHAS Funded PATH Projects
- Go to Case Management Tab > Left Menu > Case Management > Program Enrollment > Gear
- Choose the DMHAS PATH – Full Enrollment option from the sub menu that appears. Note, this option will ONLY show if Client’s Program Enrollment Status is Enrollment Pending on the Program Enrollment Summary form.
- Data entered via the Enrollment Pending workflow will pull into the PATH/DMHAS Full Enrollment workflow.
- You will need to select “Complete Enrollment” in the PATH/DMHAS Enrollment Type field on the new PATH Determination Assessment form to trigger the PATH Full Enrollment workflow.

How to correct Services (DMHAS/PATH) – (DMHAS Funded PATH Projects)
- On the left-side navigation, click “Case Management”. On the sub-menu, click “Case Notes/Services (DMHAS/PATH)”.
- Click “Gear” for the service you wish to edit.
- Click “Edit Service” in the sub-menu that appears.
- In the “Service” field, choose the correct DMHAS/DDaP service (ex. T1016, T116B, T116C).
- Click “Save” in the bottom right corner.
Including Clinician Information in DDaP Extract – DMHAS Funded PATH Projects
Targeted Case Management Programs may wish to include clinician information on their extract. To do so, follow the instructions below.
- From the DMHAS/DDaP or PATH Outreach roles, choose the following.
- Case Management > Case Managers /Mentors > Add New
- Add a Case Manager, be sure to fill out the field titled “Clinician Credentials (TCM)”.
- When you extract a report for DMHAS, you’ll now include the clinician information.
HMIS One Time Fields – PATH (All Funders)
- Date of Engagement – This date may be on or after the Project Start Date and if the client becomes engaged, must be on or prior to the Project Exit Date. If the project has not developed this intensive relationship with the client before exit, Date of Engagement should be left blank.
- Record the date a client became engaged by a street outreach project or night-by-night emergency shelter in the development of a plan to address their situation.
- Date of PATH Status Determination can be on or before the HMIS program enrollment date.
- This is the date it was determined the client would either be enrolled or not enrolled in the PATH program.
- Client Became Enrolled in PATH
- If no, an additional question will appear “Reason Not Enrolled”
- An enrollment date is the date when a PATH-eligible individual and a PATH provider have mutually and formally agreed to engage in services and the provider has initiated an individual file or record for that individual. The date of PATH enrollment should be entered into the HMIS at the point that the client has become enrolled, using the PATH Status element (P3). It may be on or after the project start date or engagement date and prior to project exit.
- If the client exits without becoming enrolled, the PATH Status element (P3) needs to be completed, indicating that the client was not enrolled and the reason the client was not enrolled. If the client was contacted on the date that PATH Status was determined, a contact must also be entered for that date.
Current Living Situation AKA Contact/Service (Required each time services are provided) by All Funders
Record the date and location of each interaction with a client by recording their Current Living Situation. The first Current Living Situation with the client will occur at the same point as Project Start Date and therefore requires a record to be opened in the HMIS for the client. All street outreach projects are expected to record every contact made with each client by recording their Current Living Situation, including when the Project Start Date, Prior Living Situation or Date of Engagement is recorded on the same day. There may or may not be a contact made at project exit. Contacts include activities such as a conversation between a street outreach worker and client about the client’s well-being or needs, an office visit to discuss their housing plan, or a referral to another community service.
- On the left-side navigation, click “Case Management”. On the sub-menu, click “Current Living Situation”.
- Click “Add new” (top left corner).
- Enter the “Information Date”
- Choose the “Project” the client is enrolled in and wait for the screen to load (clt must be enrolled to enter svcs/all svcs attached to the program will be displayed).
- Choose the “Current Living Situation” for the client.
- Enter the “Location details”
- Select the “Service Type” from the drop down menu.
- Click Save at the bottom of the form.
Referrals (PATH Specific) (Required each time a referral is made) by All Funders
- On the left-side navigation, click “Case Management”. On the sub-menu, click “Referrals (PATH Specific)”.
- Click “Add new (PATH)” (top left corner).
- Choose the PATH program enrollment from the “Enrollment” drop down.
- Click on the magnifying glass or in the Refer To field.
- Choose the “Provider” from the list displayed in the Provider Referral (PATH) Lookup screen .
- Enter the “Referral Date”, “Referral Status” and Outcome”. See below for outcome definitions:
- “Attained” means the client was connected and received the service
- “Not attained” means the client was referred to, but may not have ever been connected with, the service or did not actually receive the service
- “Unknown” means the status of the client’s connection or receipt of service is unknown to the provider entering the data.
- Enter a Case Note if applicable/required.
- Click Save after entering required information.
Referral setup for the report is documented here.
Updating a Client’s record (During/Annual Assessment)
- On the left-side navigation, click “Case Management”. On the sub-menu, click “Program Enrollment”.
- Click on the gear next to the Program Enrollment that requires an update/Periodic Assessment.
- Click on New During Program Assessment or New Annual Assessment as appropriate. Annual Assessments are ONLY required to be used for HUD funded programs that are required to complete the CAPER or APR.
- Complete all required questions in the workflow, clicking save at the end of each assessment.
- Click “Done” in the workflow is now complete screen.
- Enter a Case Note/Service (DMHAS/PATH) with the same date as the update assessment you just entered (this is required).
Exiting/Discharging a Client from a program – All Funders
- On the left-side navigation, click “Case Management”. On the sub-menu, click “Program Enrollment”.
- Click on the gear next to the Program Enrollment that has ended.
- Click on Exit Enrollment NOT Edit/Exit Enrollment.
- Choose whether to Exit ALL Clients or the CURRENT Client ONLY.
- Complete all required questions in the Exit Assessments and click Save at the end of each assessment.
- The Connection with SOAR question is to identify persons who are connected to the SOAR (SSI/SSDI Outreach, Access and Recovery) program.
Uploading/Deleting Files and Documents – All Funders
You can upload any saved file/document to a client’s record (ex. copy of Id, Birth Certificate, Utility bills, etc)
To upload a file or document
- On the left-side navigation, click “Case Management”.
- On the sub-menu, click “Files and Documents”.
- When the dashboard for “View Photos” is displayed, Click on “Documents”.
- The “Document Check – CTHMIS” screen will load. Click on “Add New” in the top right corner of that page.
- Complete all required fields. Choose the Document Type, Verification Method, Storage Location.
- Next you need to upload the Image by clicking on “Browse” to choose from the list of saved files on your computer/server. Once the desired file is located, double click on it to upload it.
- Click Save and the file will be uploaded to the client’s record in HMIS.
- To view the Documents and Files that a client has in HMIS, simply click on Documents or View Photos (located in the View Photos dashboard found after clicking on Files and Documents in the left-side menu).
To Delete an uploaded document
- On the left-side navigation, click “Case Management”.
- On the sub-menu, click “Files and Documents”.
- When the dashboard for “View Photos” is displayed, Click on “Documents”.
- From the “Document Check – CTHMIS” screen, select the checkbox next to the row you want to delete. When the row highlights, click the “X” icon, and click OK to the confirmation popup.
- Click Save at the bottom of the form.
HMIS Data Standards Manual link
Below you will find the link for the HMIS Data Standards Manual where you can find more PATH specific information from the federal partners (ex. why is this question asked?): FY 2024 HMIS Data Standards Manual V.1.3