
SNOFO PSH Services Only Quick Guide
To download or print this document, please click here.
Table of Contents
Getting CT HMIS Help and Training
Enrolling a Client into a program:
Updating a Client’s record using the “New Annual or During Program Assessment workflows”:
Exiting a Client from a program:
Overview
Getting CT HMIS Help and Training
Technical support is available from our Help Desk via a variety of methods for any questions regarding either the CaseWorthy software or with Policy and Procedure standards.
- Email: help@nutmegit.com
- Online Resources and Information: http://www.cthmis.com/ or HMIS Knowledge Base
Logging into CaseWorthy
- Access the Live CT HMIS site by going to https://prod.caseworthy.com/cthmis_prod.caseworthy
- Enter your Username and Password.
- If you forget your password, simply click the Forgot Password link and follow the prompts.
Instructions
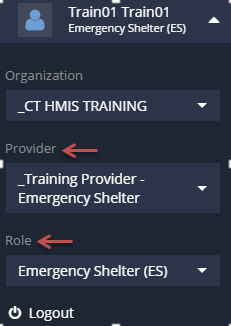
Before You Begin:
- Please ensure you are using the correct Role (Click on the arrow located in the Top right corner to expand the user are as displayed in the screenshot below).
- Your Provider should be the name of the Provider you wish to enter data for (Top right corner).
Enrolling a Client into a program:
- Click “Enroll Client” from the left side menu to launch the workflow.
- Enter the CaseWorthy ID or the first few letters of the First and Last Name and Date of Birth
- Click “Check for duplicates” and review the results
- If the client is not found in the search results, click This is a new client to proceed.
- Complete all required fields indicated by the stars.
- Click Save.
- The “CCEH HMIS Add Family Member Spreadsheet” screen will load, if enrolling a family, complete the following steps:
- Click Add Row to enter additional family members. Add all family members, BEFORE clicking the Save button!!
- Check for Duplicates is required (*) for each additional family member. If no matches are found, you must click the “This is a new client” button to proceed. If a match is found, click on the name to select it.
- Click Save to proceed to the next page (located in the bottom right corner).
- Enter the Section I: Release Share Status. If a client refuses to sign the ROI, do not enter that person in your program in HMIS (you will not see a save button if that is selected). Complete all required fields and click save.
- Enter the Release Start Date and the Release End Date. The standard HMIS release period for CT is 2 years.
- Choose “Yes”for:
- Client/Witness (case manager/staff) has signed Release.
- Click Save to proceed to the next page (located in the bottom right corner)
- Choose the Program the client is being enrolled in. Verify the Provider matches the name in the program drop down you selected.
- Make sure the Program Entry Date is accurate!
- Click SAVE at the bottom right corner.
- Next the HMIS Enrollment Members screen will appear
If enrolling a Single person (no family members) simply click Save to proceed to the next page.
If enrolling a family, follow the steps below:
-
- Click the checkbox next to family member’s names to include them in the program enrollment and the rest of this workflow. Their checkbox will turn blue.
- Make sure to change the Begin Date to the correct date!
- Click Save to proceed to the next page (located in the bottom right corner).
- Complete the assessments as prompted from within the Enroll Client Workflow, clicking “SAVE” at each screen when you have provided answers to all required questions (indicated by the stars). If you enrolled a family, you will have to complete assessments for all family members.
- Once you have completed the workflow, the client will appear as “Enrolled” in the Enrollment Member – CT HMIS screen (found by clicking Case Management>Program Enrollment left side menu).
Services
- On the left-side navigation, click “Case Management”.
- On the sub-menu, click “Services”.
- Click “Add new” (top left corner).
- Choose the “Program” the client is enrolled in and wait for the screen to load the services attached to the program.
- If a client is exited, no program enrollment will show.
- Click on the checkboxes for the Services you wish to add.
- Change the Begin Date & End Date to the same date ex. 10/01/2015-10/01/2015.
- Click Save at the bottom of the form.
Updating a Client’s record using the “New Annual or During Program Assessment workflows”:
- On the left-side navigation, click “Case Management”.
- On the sub-menu, click “Program Enrollment”.
- Click on the gear next to the Program Enrollment that has ended.
- Click on New During Program or Annual Assessment.
- Complete all required questions in the workflow, clicking save at the end of each assessment.
- Click “Done” in the workflow is now complete screen.
Exiting a Client from a program:
- On the left-side navigation, click “Case Management”.
- On the sub-menu, click “Program Enrollment”.
- Click on the gear next to the Program Enrollment that has ended.
- Click on Exit Enrollment for ALL Family Members. Do NOT Edit/Exit Enrollment.
- Enter the End Date for the program enrollment (aka Exit/Discharge date). Click Save.
- Complete all required questions in the Exit Assessments and click Save at the end of each assessment.
Files and Documents
You can upload any saved file/document to a client’s record (ex. copy of Id, Birth Certificate, Utility bills, etc)
To upload a file or document
- On the left-side navigation, click “Case Management”.
- On the sub-menu, click “Files and Documents”.
- When the dashboard for “View Photos” is displayed, click on “Documents”.
- The “Document Check – CTHMIS” screen will load. Click on “Add New” in the top right corner of that page.
- Complete all required fields. Choose the Document Type, Verification Method, Storage Location.
- Next you need to upload the Image by clicking on “Browse” to choose from the list of saved files on your computer/server. Once the desired file is located, double click on it to upload it.
- Click Save and the file will be upload to the client’s record in HMIS.
- To view the Documents and Files that a client has in HMIS, simply click on Documents or View Photos (located in the View Photos dashboard found after clicking on Files and Documents in the left-side menu).
To Delete an uploaded document
- On the left-side navigation, click “Case Management”.
- On the sub-menu, click “Files and Documents”.
- When the dashboard for “View Photos” is displayed, click on “Documents”.
- From the “Document Check – CTHMIS” screen, select the checkbox next to the row you want to delete. When the row highlights, click the “X” icon, and click OK to the confirmation popup.
- Click Save at the bottom of the form.
Below you will find the link for the HMIS Data Standards Manual where you can find more specific information from the federal partners (ex. why is this question asked?):
https://www.hudexchange.info/resources/documents/HMIS-Data-Standards-Manual.pdf