
Coordinated Access Network and Coordinated Exit 2.0 Quick Guide
To download or print this document, please click here.
Table of Contents
Getting CT HMIS Help and Training
Coordinated Access-Exit Network (CAN) Instructions
Step 1: Reviewing Scheduled Appointments
Step 2: Processing a Referral (for ALL clients that DO show up for their CAN appointments)
Step 2a: How to add a client to the Appointment Scheduler to schedule a CAN appointment.
Step 2b: How to Schedule/Reschedule a CAN appointment.
Step 3: Completing the CA Referral
A. Enrollment into a program (Accepted for Enrollment) or Diversion (Diverted – At CAN appointment)
Moving a client off the waitlist
Coordinated Entry Event Scenarios (LINK)
Reviewing Referrals to your Network
How to Correct these mistakes?
Basic Demographics – CA – Statewide
Referrals to CA – Enhanced – Statewide
Avg Time from Referral to Appt
Overview
The VI-SPDAT section of this guide has been removed as it has been retired and replaced by the By Name List. The BNL documentation is located here: By Name List Report – V2.
Getting CT HMIS Help and Training
Technical support is available from our Help Desk via a variety of methods for any questions regarding either the CaseWorthy software or with Policy and Procedure standards.
- Email: help@nutmegit.com
- Online Resources and Information: http://www.cthmis.com/ or HMIS Knowledge Base
Logging into CaseWorthy
- Access the Live CT HMIS site by going to https://prod.caseworthy.com/cthmis_prod.caseworthy
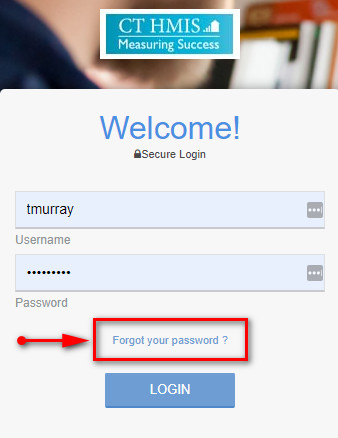
- Enter your Username and Password.
- If you forget your password, simply click the Forgot Password link and follow the prompts.
Instructions
Before You Begin
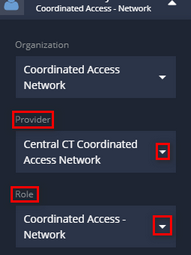
- Please ensure you are using the correct Role (Click on the arrow located in the Top right corner to expand the user are as displayed in the screenshot below).
- Your Provider should be the name of the Provider you wish to enter data for (Top right corner).
Coordinated Access-Exit Network (CAN) Instructions
Step 1: Reviewing Scheduled Appointments
- Click “Appointment Schedule” in the left side menu. When the sub menu appears to the right, click on “Appointment Schedule” again.
- Click the action gear next to the name of the Coordinated Access Network schedule you wish to review.
- Click on “View UPCOMING Reservations”
- Click on the client ID in blue for the client you wish to load
- Make note of this ID Number. This is the ID number you will want to use for this client for every phase of CAN and provide the to HMIS agency that accepts the client for enrollment!
Step 1a: Entering a CAN “No Show” in CaseWorthy (For ALL clients that DO NOT show up for their CAN appointments)
- Click the “Client Management” left-side navigation menu
- Click “Complete Referral / Enrollment”
- You should see an enrollment created by the “Coordinated Access 211” program.
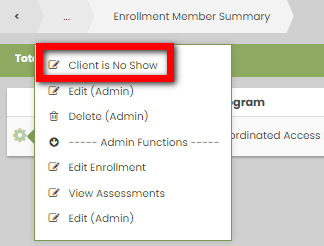
- Click the Action Gear icon next to the Coordinated Access Network program enrollment and choose “Client is No Show” (see screenshot below).
- The “WF Client Referrals-CA” screen will display. Click the checkbox next to the referral you are updating.
- Change the Referral Status from to “No Show”.
- Click “Save” and Click “Done”.
Step 2: Processing a Referral (for ALL clients that DO show up for their CAN appointments)
To begin processing a referral you must have a client already enrolled by 211 and referred to, (had an appointment with) your Coordinated Access Network.
- Click “Process Referral” at the top of the screen.
- Enter the CaseWorthy ID (found in the Appt Schedule). Make sure to enter the same client ID number that matches the client ID associated with the 211 enrollment/appointment.
- Click “Check for duplicates” and review the results.
- The client will appear in the Check for Duplicates box. Make sure to select the same client ID number that matches the client ID associated with the 211 enrollment/appointment.
- Click on the client’s name to load their demographic information.
- Complete all required fields (indicated by the gray stars).
- Click Save.
- The “CCEH HMIS Add Family Member Spreadsheet” screen will load, if enrolling a family, complete the following steps:
- Click “Add Row” to enter additional family members. Add all family members, BEFORE clicking the “Save” button!!
- “Check for Duplicates” is required (*) for each additional family member. If no matches are found, you must click the “This is a new client” button to proceed. If a match is found, click on the name to select it.
- Click “Save” to proceed to the next page (located in the bottom right corner).
- Next you will see the “Release of Information” screen. Change the dates to the correct date and click Save.
- The “Enrollment Add/Edit – CAN” screen will load. Choose the Program related to your CAN.
- Verify the Provider name matches the CAN name in the program drop down you selected.
- If the Provider is incorrect, you may have access to more than one CAN and should cancel the workflow and in the top left corner of the main window, choose a different provider and restart the workflow from Step 1.
- Make sure the start date is accurate (HMIS will default to today’s date).
- Verify the Provider name matches the CAN name in the program drop down you selected.
- Click Save at the bottom right corner of the “Enrollment Add/Edit – CAN” screen.
- Next the HMIS Enrollment Members screen will appear.
- If enrolling a Single person (no family members) simply click “Save” to proceed to the next page.
- If enrolling a family, follow the steps below:
- Click the “checkbox” next to family member’s names to include them in the program enrollment and the rest of this workflow. Their “checkbox” will turn blue.
- Make sure to change the “Begin Date” to the correct date!
- Click “Save” to proceed to the next page (located in the bottom right corner).
- Next the CAN Appointment Type Assessment form will appear.
- Referral from 211 – This option is for individuals that show up for their scheduled CAN appointments made by 211.
- These individuals will be located on a CAN Appointment Schedule
- Walk-in at CAN – Select this option for clients that walk in to a designated walk in center for a CAN Intake, that was NOT scheduled by 211. These individuals will NOT be located on a CAN Appointment Schedule until you schedule their appointment (see Step 2a: How to add a client to the Appointment Scheduler to schedule a CAN appointment.) AFTER completing the Process Referral workflow.
- There are Services and a Referral that is auto–created when Walk-in at CAN is selected. See list below:
- Appointment Service – Housing Assistance
- CE Event – Problem Solving/Diversion/Rapid Resolution/Intervention/Service
- Referral – Status = Referred
- There are Services and a Referral that is auto–created when Walk-in at CAN is selected. See list below:
- Referral from 211 – This option is for individuals that show up for their scheduled CAN appointments made by 211.

c. Complete PENDING Intake – FULL Enrollment – This option allows you to complete a pending enrollment that was initially started for a client. It includes the full CAN Assessment.
d. Schedule Appointment – PENDING Enrollment – This option allows you to create a pending/partial enrollment for clients in order to schedule a CAN Appointment. Users should intend to complete the CAN Enrollment at a later time.
- Complete the assessments as prompted from within the Process Referral Workflow, clicking “Save” at each screen when you have provided answers to all required questions.
- On the CA Intake Form the DCF Youth Questions will only appear for Individuals that fall in the 18-24 yr old Youth group.
- Refer to Current Living Situation and Coordinated Entry Event for more information on completing those forms.
- Once you have completed processing the referral the client will appear as “Enrolled” on the Enrollment Member – CA – Network screen (found by clicking on Client Management>Complete Referral/Enrollment).
Step 2a: How to add a client to the Appointment Scheduler to schedule a CAN appointment.
*** This step is required to allow the client to have an appointment scheduled, in step 2. You will only need to complete this step once for an open CAN enrollment. ***
- On the left-side menu, click “Appointment Schedule”. On the sub-menu, click “CA – Appointment Schedule”. The Appointment Scheduler screen will load.
- Click on the “Gear” next to the Coordinated Access Network you want to enroll the client in.
- Click on “Step 1: Add Client to Network” in the menu that appears.

- Click “Add Row”. Your screen will add a row to allow you to search for your client.
- Click into the “Client field” (or on the magnifying glass) and you will be brought to a Find Client w/Reservation Info – CTHMIS Lookup screen.
- Enter the Client ID (aka CAN/HMIS/CaseWorthy ID) and click Search.
- Click on the Client’s name when it appears in the search screen.
- Change the “Appointment Start Date” to the date you want the client enrolled (should be the date of the appointment).
- Click “Save” to proceed to the next page (located in the bottom right corner). You will be brought back to the Appointment Scheduler screen.
Step 2b: How to Schedule/Reschedule a CAN appointment.
- Click on the “Gear” next to the Coordinated Access Network you want to enroll the client in.
- Click on “Step 2: Make Appointment” in the menu that appears. The Step 2: Make Appointment screen will load so that you can schedule an appointment.
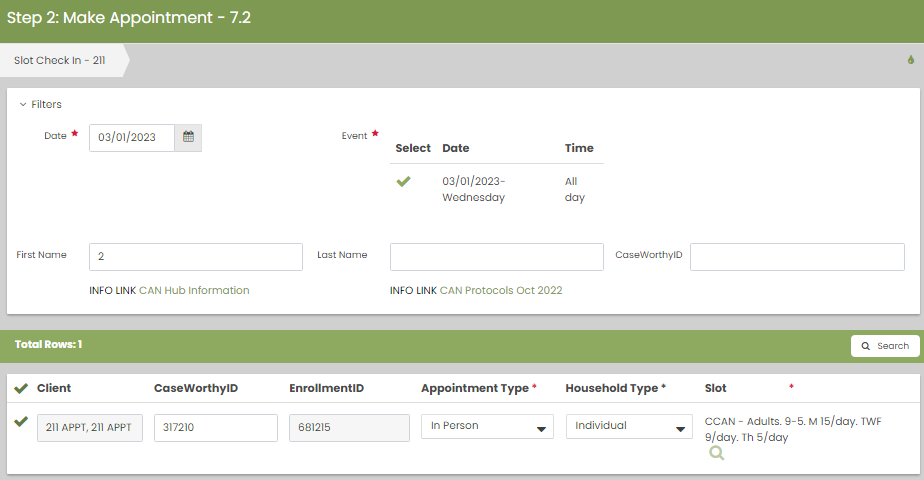
- Change the “Date” to the date of the appointment.
- Enter the “Client ID” (aka CAN/HMIS/CaseWorthy ID) and click “Search”.
- Click on the “Checkbox” next to the client’s name when it appears.
- Choose the “Appointment Type” from the drop-down menu.
- Choose the “Household Type” if the drop-down menu appears for that CAN.
- Note if the CAN is listed as GNH – Families or GNH – Individuals this field will not show the drop down menu
- Choose the “Slot”. This is the location, date/time and type of appointment.
- After reviewing/confirming the information entered is correct, click “Save” to check schedule the client’s appointment for that date. (Located in the bottom right corner).
- You will be brought back to the Appointment Scheduler screen.
Step 3: Completing the CA Referral
Once a client referral has been assessed and enrolled into the CAN’s program in HMIS, it has several possible next-steps to complete the referral process. CAN Appointment Outcomes are listed below:
- Accepted for Enrollment — you are able to place the client into a program within your network.
- Added to Waitlist — you do not have any open slots for this person and they are put on a waitlist
- Diverted — At CAN appointment (formerly ‘Diverted’) — you are able to find alternate resources for this client during their CAN appointment.
- Diverted — BEFORE CAN appointment — you are able to find alternate resources for this client before their CAN appointment which results in a cancellation (no longer a need) of the CAN appointment.
- Not Currently Appropriate – When an individual or family is not currently appropriate for shelter services.
- This value will also trigger additional dropdown options to provide more information about why the client is not appropriate for the services.
- Referred to Outreach Team
- Unable to Contact
- Referred to Warming Center
- Unsheltered – Housing Plan in Place
- Client Refused Shelter — you have an available shelter bed but the client declines to take it. Removed 2.17.22
- Referral Canceled — this is a status that 211 would complete in the event that the client called back and canceled the appointment.Removed 2.17.22
Enrollment into a program (Accepted for Enrollment) or Diversion (Diverted – At CAN appointment)
- First, find the client you wish to Enroll into a program or Divert using “Find Client”.
- Enter the client’s HMIS ID or type in the client’s first three letters of their first and last name and click Search.
- If multiple clients appear in the search field make sure to select the client id that is on the Appointment Schedule. If a duplicate client appears please let us know.
- Click on “Client Management” in the left side parent menu.
- Click “Complete Referral / Enrollment” – You should see two enrollments:
- One created by the “Coordinated Access 211” program, which should not be altered by the CAN unless the client is a NO SHOW
- One for your CAN with a begin date and marked as “present”
- Click the Action Gear icon next to that enrollment and choose “Complete CA Referral”. This will launch the workflow to complete the Coordinated Access Referral
- If you provide any services you may select those next. If not, simply click save.
- Click the checkbox next to the Referral Date.
- Update the Referral Status from “Referred” to “Accepted for Enrollment” or “Diverted” and click Save.
- The “Coordinated Access” assessment will load and display Exit questions and outcomes.
- Your options will be
- Diverted In Place
- Diverted Relocation
- Program Enrollment
- PROGRAM ENROLLMENT – select Program Enrollment and select the appropriate exit destination – click Save
- DIVERTED w RELOCATION or DIVERTED IN PLACE simply supply the data for the fields and save
- Refer to Current Living Situation and Coordinated Entry Event for more information on completing those forms.
- and then done when the screen with the Workflow is Complete.
- The client should now appear as “Exited” with the exit date.
Waitlist
- Click on “Client Management” in the left side parent menu
- Click “Complete Referral / Enrollment” in the sub menu that displays to the right. You should see two enrollments, one created by the “Coordinated Access 211” program, which should NOT be altered by the CAN and one for your CAN with a begin date and the end date should show as “present”.
- Click the Action Gear icon next to that enrollment and choose “Add to Waitlist” for your CAN’s program enrollment.
- The “Program Wait List Client Side” window will appear. Answer the questions and click “Save”.
- The “WF Client Referral” screen will display, click the checkbox next to the referral you are updating. Change the Status from “Referred” to “Added to Waitlist”, Click “Save”, Click “Done”.
- Check the waitlist to make sure your client has been added. Click “Waitlist for CA Clients” on the left side menu and review the list.
Moving a client off the waitlist
- Click “Waitlist for CA Clients”.
- Find the client needing the update, use the ECM ID search at the top of the list.
- Click the Action Gear and choose “Edit”.
- Set the Waitlist Status to “Closed” and enter the date.
- Click “Save”.
Current Living Situation
Record the date and location of each interaction with a client by recording their Current Living Situation. The first Current Living Situation with the client will occur at the same point as Project Start Date and therefore requires a record to be opened in the HMIS for the client.
For Coordinated Entry projects, record a Current Living Situation anytime any of the following occurs:
- A Coordinated Entry Assessment or Coordinated Entry Event is recorded; or
- The client’s living situation changes; or
- If a Current Living Situation hasn’t been recorded for longer than a community-defined length of time (i.e. longer than 90 days). The CoC must be involved in the determination of “community-defined length of time;” or
- Project Start
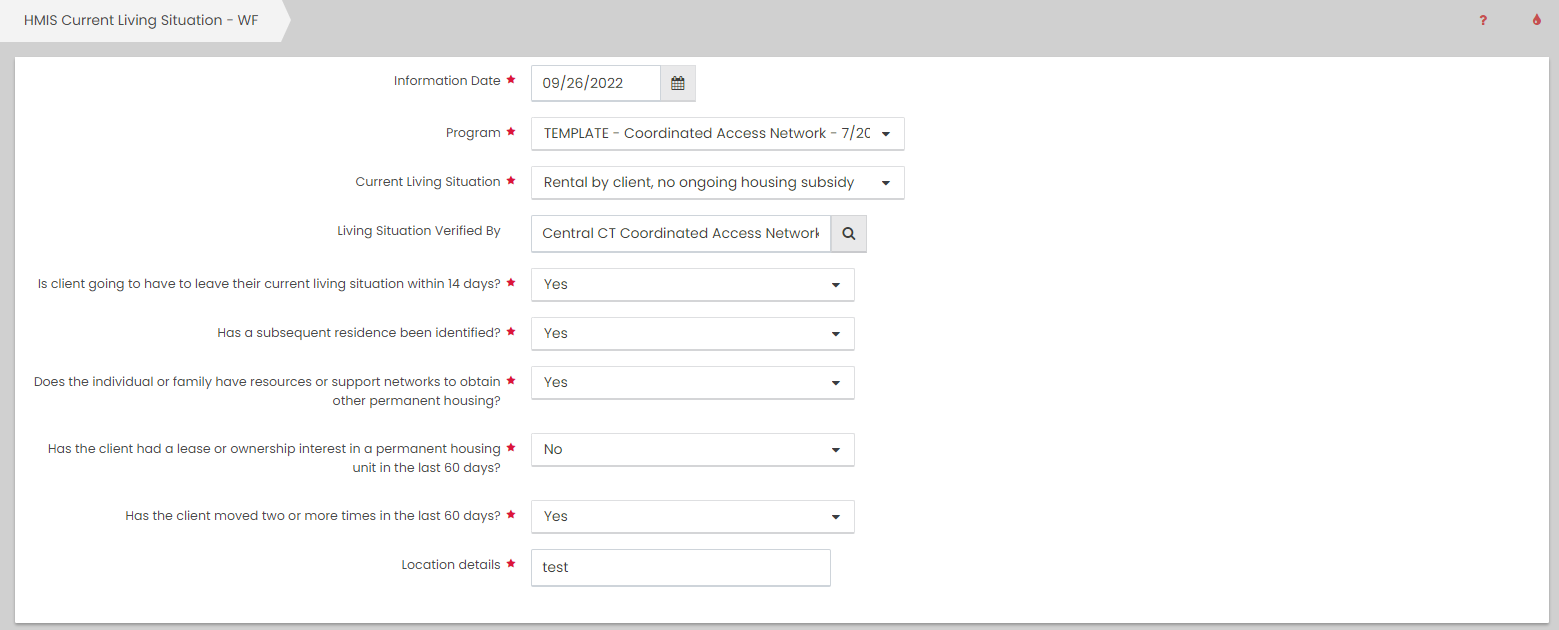
To record a Current Living Situation in CT HMIS for a client follow the steps below:
- On the left-side navigation, click “Case Management”. On the sub-menu, click “Current Living Situation”.
- Click “Add new” (top left corner).
- Enter the “Information Date”
- Choose the “Project” the client is enrolled in and wait for the screen to load.
- Choose the “Current Living Situation” for the client.
- Enter the “Location details”
- Select the “Service Type” from the drop down menu.
- Click Save at the bottom of the form.
Coordinated Entry Event
Coordinated Entry Event Scenarios (LINK)
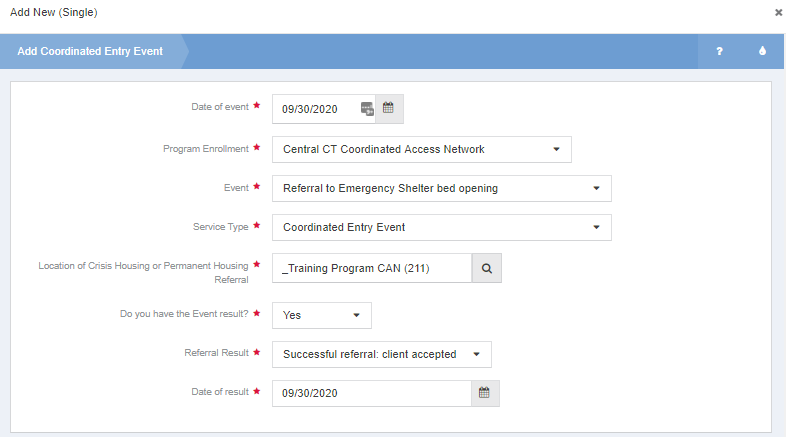
- On the left-side navigation, click “Case Management”. On the sub-menu, click “Coordinated Entry Events”.
- Click “Add New (Single)” or “Add New (Multi)” in the top left corner.
- Enter the “Date of event”
- Choose the CAN “Program Enrollment” from the drop down menu.
- Select the “Event” for the client from the drop down menu. You’ll have the option to choose from Access Events or Referral Events.
- Select the Coordinated Entry Event “Service Type” from the drop down menu.
- One Access Event (Problem Solving/Diversion/Rapid Resolution intervention or service) and several Referral Events will trigger the below questions that may appear depending on the type of “Referral Event” that is selected.
- Enter the “Location of Crisis Housing or Permanent Housing Referral” from the HMIS Project Lookup form by clicking on the magnifying glass and entering the “Project Name“ in the search field.
- Answer the “Do you have the Event result?” Yes/No
- Answer the “Problem Solving/Diversion/Rapid Resolution intervention or service result – Client housed/re-housed in a safe alternative? Yes/No
- Answer the “Referral to post-placement/follow-up case management result – Enrolled in Aftercare project?“ Yes/No
- Enter the “Referral Result“
- Enter the “Date of result”
- Click Save at the bottom of the form. Below is a screenshot of the Add New (Single) form.
Face Sheet
A report summarizing basic demographics, registry status, enrollments and other helpful information is available under the “Coordinated Access – Network” role under “Client Management > Complete Referral / Enrollment > Action Gear ICON for a CAN enrollment> Face Sheet (Report).
Reviewing Referrals to your Network
To review your referrals
- On the left-side navigation, click “Referrals to CA”
- In the sub menu that displays, choose either Referrals to CA – Basic or Referrals to CA – Enhanced.
- The “Referrals to Provider” screen will load. By default only referrals with a status of “Referred” will display. You can filter via the following fields: Name, ECM ID, Status, or Referral Date
- A referral can be manually changed when needed by choosing the Action Gear next to the referral and choosing edit. This should normally only be done for a correction of bad data entry.
Files and Documents
You can upload any saved file/document to a client’s record (ex. copy of Id, Birth Certificate, Utility bills, etc)
To upload a file or document
- On the left-side navigation, click “Client Management”
- The “Client Management” menu will be displayed. Click on “Files and Documents” in the bottom of that menu.
- When the dashboard for “View Documents and Photos” is displayed, Click on “Documents”.
- The “Document Check – CTHMIS” screen will load. Click on “Add New” in the top right corner of that page.
- Complete all required fields. Choose the “Document Type, Verification Method, Storage Location”.
- Next you need to upload the Image by clicking on “Browse” to choose from the list of saved files on your computer/server. Once the desired file is located, “double click” on it to upload it.
- Click “Save” and the file will be uploaded to the client’s record in HMIS.
- Verify the document was uploaded by following the next step!
- To view the Documents and Files that a client has in HMIS, simply click on Document & File View (located in the View Photos dashboard found after clicking on Files and Documents in the left-side menu).
To Delete an uploaded document
- From the “Document Check – CTHMIS” screen, select the checkbox next to the row you want to delete. When the row highlights, click the red “X” icon, and click OK to the confirmation popup.
- Click “Save” at the bottom of the form.
Checking Data Quality
What happens if the Duty Service Coordinator doesn’t process the referral from 211?
There are times when the DSC either forgets to process a “No-Show” client, or does not process the referral after a CAN Intake has been completed. A report has been created that will show you clients that were not completely processed.
To access the view;
- Click on the “CA Network Data Quality” link (it may say (beta) that is OK)
- If there are any clients that have an error condition, a list will appear in the window that contains the following;
- Client ID
- Client Name
- Problem Condition
- “Referral Status = ‘Referred’, Appointment is XX days old” — this means that a person’s appointment date has passed, and the referral status has not been updated. You will need to update the record to reflect what happened (no-show, diverted, waitlist or enrolled in program)
- Enrolled on by 211 – date that the person called 211
- Appointment time at CAN – date the client was supposed to have an appointment at the local network
NOTE: only records that are more than 2 days old will appear on this list (to give staff at least a day after the appointment to update the computer system.
How to Correct These Mistakes?
Find “Step 3: Completing the CA Referral” in the above paragraphs follow the instructions based on what happened to that client;
- Enrollment into a program
- Diversion
- Waitlist
- No Show (If the client was a No Show that would have already been addressed.)
Once you have updated the record, the client will NOT appear in this error report.
If you need to Export this list to MS Excel, click on the Excel icon just above the form name “CA Network Data Quality Problems”
Reporting
The following reports can be found in the left hand menu titled “Referrals to CA”
Referrals to CA – Basic
- Who can use this — anyone in the Coordinated Access Network
- What it does — listing of all client referrals, status and other data related to the referral that can be extracted to MS Excel to create statistics
- Selection Criteria — end user needs to enter a date range, the output will only show referrals made to your specific CAN.
- Known issues — the on screen display will only show 1000 rows, you will get the full dataset when you extract – ONLY 5000 rows can be extracted at any given time.
Referrals to CA – Enhanced
- Who can use this — anyone in the Coordinated Access Network
- What it does — listing of all client referrals, status, client data, assessment data, appointment data related to the referral that can be extracted to MS Excel to create statistics
- Selection Criteria — end user needs to enter a date range, the output will only show referrals made to your specific CAN.
- Known issues — the on screen display will only show 1000 rows, you will get the full dataset when you extract – ONLY 5000 rows can be extracted at any given time. You MAY see duplicate clients if the client had more than 1 Enrollment during the time period or more than 1 Appointment during the time period.
The following reports can be found in the left hand menu titled “CAN Data Views”
Basic Demographics – CA – Statewide
- Who can use this — statewide administrators
- What it does — listing of all clients that have PRESENTED to the CAN (meaning that they have come to an appointment AND an enrollment record was created). Data points include (but are not limited to); clientID, age, race, ethnicity, household size (family or individual), enrollment date
- Known issues — the on screen display will only show 1000 rows, you will get the full dataset when you extract.
Basic Demographics – CA – CAN
- Who can use this — anyone in the Coordinated Access Network
- What it does — listing of all clients that have PRESENTED to the CAN (meaning that they have come to an appointment AND an enrollment record was created). Data points include (but are not limited to); clientID, age, race, ethnicity, household size (family or individual), enrollment date
- Known issues — the on screen display will only show 1000 rows, you will get the full dataset when you extract.
Referrals to CA – Statewide
- Who can use this — statewide administrators
- What it does — listing of all referrals, status and other pertinent data that can be extracted to MS Excel to create statistics. Currently looks at all referrals that have been made since the beginning of Coordinated Access, there is no date selection.
- Known issues — the on screen display will only show 1000 rows, you will get the full dataset when you extract.
Referrals to CA – Enhanced – Statewide
- Who can use this — statewide administrators
- What it does — listing of all client referrals, status, client data, assessment data, appointment data related to the referral that can be extracted to MS Excel to create statistics
- Selection Criteria — end user needs to enter a date range, the output will only show referrals made to ANY CAN.
- Known issues — the on screen display will only show 1000 rows, you will get the full dataset when you extract – ONLY 5000 rows can be extracted at any given time. You MAY see duplicate clients if the client had more than 1 Enrollment during the time period or more than 1 Appointment during the time period.
Avg Time from Referral to Appt
- Who can use this — anyone in the coordinated access network
- What it does — determines the average number of days it takes from when the person calls 211 (referral date) and the date the appointment is set (appointment date). The average is based on Calendar days.
- Known issues — None
- Records excluded — if a person has an appointment date that is prior to the referral date we do not include those records in the calculation (this is a data entry error that needs to be corrected by 211)
Avg # of Days on Waitlist
- Who can use this — anyone in the coordinated access network
- What it does — determines the average number of days that people are on the waitlist by subtracting the (Date removed from waitlist) from the Date Added to the waitlist (date added) (if the person is still on the waitlist, then it uses the day you run as the end date)
- Known issues — none
- Records Excluded — if a person’s date removed from the waitlist is prior to the date added to the waitlist, we do not include those records in the calculation (this is a data entry error by the CAN and would need to be corrected)
Demographics with Referral Status – IND (selects households with no one under 18 within the dates selected)
- Who can use this — anyone in the coordinated access network
- What it does — This view selects clients that have been enrolled by the local Coordinated Access Network. The view will show the state of the Report Category as either “Referral Status No Longer Referred” meaning that they have been processed by the local CAN and an action has been taken, OR, the status will be “Referral Status Referred, Appointment has Past”, meaning that they were referred but nothing has been updated.
- Known issues — none
- Records Excluded — none
Demographics with Referral Status – FAM (selects households with at least 1 person under 18 within the dates selected)
- Who can use this — anyone in the coordinated access network
- What it does — This view selects clients that have been enrolled by the local Coordinated Access Network. The view will show the state of the Report Category as either “Referral Status No Longer Referred” meaning that they have been processed by the local CAN and an action has been taken, OR, the status will be “Referral Status Referred, Appointment has Past”, meaning that they were referred but nothing has been updated.
- Known issues — none
- Records Excluded — none
Additional Information